So since you all are so good to me I thought I would give you a little something back by having her here to show you what she does and how she does it!
This is Mary's first guest appearance on a fellow blog so please stop by and show her some love =)
Hi Everybody! For those of you that don’t know me, my name is Mary, and I own a small business named The Decorative Paintbrush! Well, actually I am co-owner of 2 businesses; The Decorative Paintbrush which is my passion, more than my paycheck, and 2 Women and a Paintbrush the one that is a bit of both! I mention 2 Women and a Paintbrush because without “IT” there would not be the other.
See about 8 years ago my partner and I needed a flexible job that paid the bills, filled our creative spirits and most importantly allow us time with our then, 5 young children. We decided to draft up some flyer's and put them around neighborhoods just to see what we would get. Low and behold our decorating/wallpapering/painting business took off!
As the demand for artistic pieces grew, so did the need to branch off, so last year we launched The Decorative Paintbrush.
We have an Etsy store, thedpb which has been doing wonderfully, especially on our smaller items, like jewelry boxes, hair tie holders and coat racks. We also have a great following on our Face Book Page where we like to keep people up to date on all sorts of creative endeavors and then we have our blogs. We also attend several local craft shows a year where we sell a lot of our larger pieces as well.
Although, The Decorative Paintbrush is mainly about furniture makeovers and upcycling, we do build some new pieces ourselves and occasionally, we purchase (cue the bad music, danta da da!) a piece of furniture too (if we're doing a custom piece). Really though, 85% of the fun is the hunt! Garage sales, thrift stores, auctions, estate sales and (even to my children’s horror) pick-ups on the side of the road (they call it social suicide; I call it “winning, dugh!”). Those of you who are recyclers, you know exactly what I’m talking about!
I am so grateful that Sommer saw my blog and asked me to guest host today! It is actually my first time, “guesting” anywhere, and I am honored that she even finds me worthy to grace her page! So, I am thrilled to be sharing my latest redo with you here at Designer Garden first, but please if you get a chance, stop on over to The Decorative Paintbrush and check out our other functional pieces of art! I hope it inspires you to get out your brushes and start coloring your world, even if it is just one piece at a time!
This piece was a great find at our local thrift store (the picture isn't the actual piece, I forgot to take a before picture, but the design is exact, it was just stained and in worse condition). The top pieces were loose and not sealed together so I decided to just unscrew them and take them off , but in doing so, I left large holes to patch. I filled them with wood putty, sanded them and primed the entire piece.
Because of the "unevenness" in the top I knew I was going have to do a faux to
camouflage the lumpiness, so I decided to age the top.
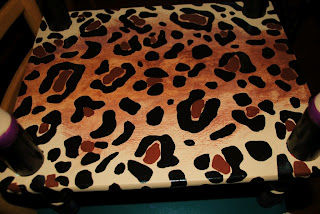
I had a gallon of light tan left over from another job, so I took it back to the paint store, had them darken it up to match the brown I was going to use in the faux and base coated the top in a dark sandy brown. Then I laid down a medium brown with a paintbrush then ragged it off with a cotton (old recycled t-shirt) cloth. Then I repeated the process with a darker brown. Then I went back in with the dark sandy brown again and in the center gently ragged outward forming a soft oblong circle where I wanted my stencil to be. Creating a "glow" that would highlight my stencil.
I traced on the stencil with a pencil. Just a side note: I always draw on my stencil first then go back and paint it in and add to it if I want. I use it more as a guide then as an actual stencil (stippling it with a paintbrush). It isn’t that I can't draw, I actually draw very well, or so I’ve been told, but I’m just impatient, (and sometimes insecure of my drawing abilities, truth be told). So I use, stencils, tracing/transfer paper or even projectors to get pictures on my furniture, but the painting, the painting is all me. Once the stencil is filled in and dried, I coat it with the crackle finish. The thicker it is the bigger the crackle, the thinner the coat the smaller the crackle, so mix it up for an aged affect, and drag your brush in different directions. I also use a large foam brush so that it doesn't leave bristle marks. Again, that whole impatient thing….it says to let it dry over night or at least for a couple hours but who has time for that! So, I always speed up the process with a blow dryer.
Once the cracks are set I take another, cotton (recycled t-shirt, good thing I have 5 kids, I go through a lot of these) dip it in some stain and gently work it into the cracks. This brings out the cracks and gives it that aged look.
Then we moved down to the bottom shelf. I base coated it in the same dark sandy color, took the Roasted Coffee and dry brushed it on creating a faux fur, then I gently rubbed more down the center simulating the “spine” of a leopard. Again, I drew on my stencil using a black paint pen and filled in the print using black paint. Then in random spots went further in and made brown spots, simulating leopard print.
To add some extra flare I painted two finials in complimentary colors and patterns and screwed them into the top panel. I kept the legs simple on this piece letting the two shelves command all the attention which worked out really well.
Well, I hope you enjoyed this tutorial. Oh, and just in case you were curious, the table was $2.00 and the paint was near nothing, although the crackle was new @ $1.99 (Hobby Lobby). So, the total cost was under $10 and really it took me about a two days to complete.


Happy Painting, Mary
Thank you so much for showing us all your trade secerets Mary! The table turned out fabulous and I'm excited to know that I'm not the only one who doesn't free hand my designs lol. Now I'm off to go check out your Etsy page!
~Sommer


6 comments:
Wow, this is beautiful! Thanks for sharing.
Okay, is it silly to comment on my own post? Is that like hitting "LIKE" on your own comment on Face Book? Oh well, Thank you again Sommer for the invite and the guest spot! You are a wonderful host. Mary
Haha Mary! It's perfectly acceptable but this is coming from a self "LIKE"er. LOL
I'm a big fan of Mary's...love all her stuff!!
Nice work, Mary! So much detail. I love it :)
-Annie @ {PP}
Absolutely FABULOUS...as is ALL Mary's funky work!!
Post a Comment